Level 3: Botcoin Hopper

Hopper:
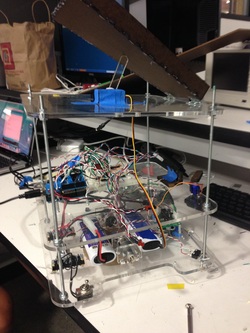
The first thing we needed to build for the botcoin management system is a hopper to hold all the coins we collect in. We opted to make this out of Duron, because we wanted the hopper to be as light as possible so that we wouldn't put undue load on the servo. We chose to CAD this part and laser cut it so that it was more precise. A CAD Drawing of the original hopper can be seen here. We hot glued the four pieces of duron together, trying our best to maintain the smoothness of the duron bed. We wanted to minimize friction between the bed and the botcoins that will be on it to ensure that they all slide out when the hopper is raised. As discussed in the design section, we iterated through several designs for this hopper, including one which operated via a Cam and a stepper motor. Ultimately, however, I'm glad that we chose the design we did. It was extremely straightforward to build. Fastening the hopper to the acrylic plate involved two very well lubricated hinges. Again, this was very simple to implement because of the design.
The first thing we needed to build for the botcoin management system is a hopper to hold all the coins we collect in. We opted to make this out of Duron, because we wanted the hopper to be as light as possible so that we wouldn't put undue load on the servo. We chose to CAD this part and laser cut it so that it was more precise. A CAD Drawing of the original hopper can be seen here. We hot glued the four pieces of duron together, trying our best to maintain the smoothness of the duron bed. We wanted to minimize friction between the bed and the botcoins that will be on it to ensure that they all slide out when the hopper is raised. As discussed in the design section, we iterated through several designs for this hopper, including one which operated via a Cam and a stepper motor. Ultimately, however, I'm glad that we chose the design we did. It was extremely straightforward to build. Fastening the hopper to the acrylic plate involved two very well lubricated hinges. Again, this was very simple to implement because of the design.
Servo and Hinge:
Again, affixing this servo was rather difficult because there weren't any obvious mounting holes for it. We decided that simply taping the servo down would give it enough support. The acrylic arm was mounted on the servo using hot glue, which again, proved to provide enough support to support the light hopper. Again, the only period across which there is a significant load on the moment arm is during the rise and fall of the hopper. We aligned the servo in such a way that when the lever was fully extended, the moment arm would be normal to the hopper.
Again, affixing this servo was rather difficult because there weren't any obvious mounting holes for it. We decided that simply taping the servo down would give it enough support. The acrylic arm was mounted on the servo using hot glue, which again, proved to provide enough support to support the light hopper. Again, the only period across which there is a significant load on the moment arm is during the rise and fall of the hopper. We aligned the servo in such a way that when the lever was fully extended, the moment arm would be normal to the hopper.
